DIY Valentine's Day Bulb


Valentine’s Day is fast approaching, and I’ve been waiting for this holiday FOREVER! No, not because of the chocolates, hearts, or flowers. Because of this fantastic project I found last year RIGHT AFTER Valentine’s Day had passed!

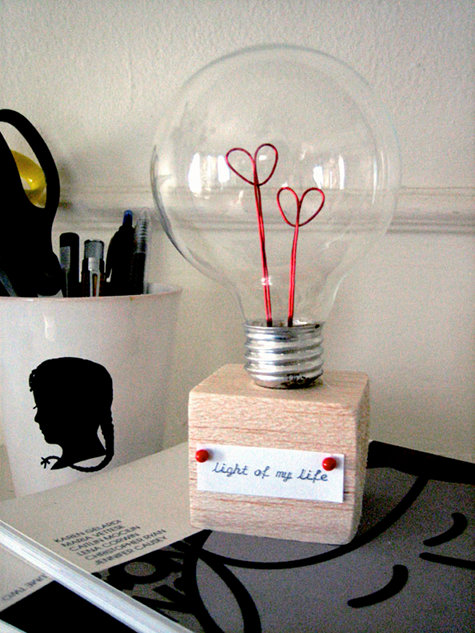
I’m personally head over heels for this DIY heart bulb. From the adorable custom message to the red wire heart, this bulb says “Be Mine” in a sweet, homemade way. Thought it doesn’t seem like the easiest DIY Project (there are several materials and steps) this Valentine’s Day bulb could easily be configured in just a few hours.

Take a look at this detailed how-to and let me know how your Valentine’s Day bulbs turn out!

Materials:
1. Red thin gauge wire (available at craft stores)
2. Light bulb (any standard incandescent bulb with a regular size base will do. No fluorescent or halogen bulbs)
3. Pliers
4. Screwdriver
5. Safety goggles
6. Scrap piece of wood or wood cube (craft stores usually sell wood for crafts and would have a small square or chunky piece that would work)
7. 2 pins
8. Paper and pen (or type written message)
9. Wire cutters
10. Hammer and nail (optional- if you are using soft balsa or craft wood these are not necessary)
11. Hot glue gun


Steps:

1. Clear a large space on a worktable to hollow out the bulb. Follow these steps from teamdroid.com – they give great, easy to follow instructions including tips on safety and procedure.

2. When finished, clean the outside of the bulb carefully and set aside somewhere where it is protected from breaking.

3. Cut a ten inch piece of wire (this is what you’ll use to make the heart). Fold the wire in half to create a sharp crease, then unfold. about an inch from the crease, take both loose wire ends and loop both wires around to create the heart halves. Pull both wires back down, overlapping the center of the crease and extending beyond the heart shape. You may want to tweak the heart halves a little to get heart shape that you like. Your heart should be about 1/2″ wide so it will fit through the base of the bulb pretty easily.
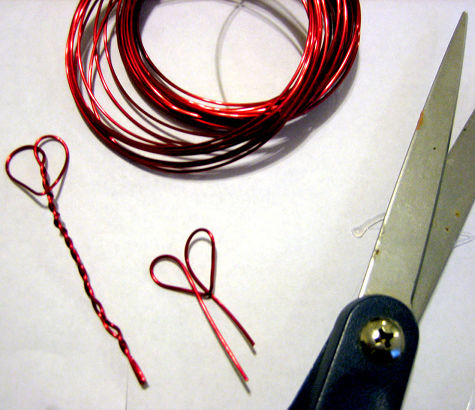


4. Take your hearts and hold up to your bulb to measure how long the stems need to be to have the heart filaments positioned in roughly the center of the bulb. Cut the extra wire off the ends. Also, test that they fit into your bulb without having to smash them or distort the shapes. If needed, adjust the size.

5. If your wood is soft, you should be able to poke the wires down into the top of the wood and they will stay in position. If you are using a firmer wood, use a hammer and nail to create a small guide hole. Then remove the nail and push the wire down into the hole. You may want to secure these with glue as well.

6. Place your glass bulb over the hearts and glue the bulb down to the wood at the base.

7. Use the pins to attach your love note or message to the front of the piece of wood.

There you go! All finished. Happy Valentine’s Day

Photos and DIY project originally posted on Design Sponge

A Sustainable New Year Resolution

Sustainability

Lately, I’ve been seeing a lot of posts and blogs about New Year resolutions because, hey, it’s the new year! And while I do absolutely love the idea of improving certain areas of our lives that need work; nobody is perfect. According to research by Scranton University, only about 8% of people keep their resolution.  

I think this is largely because we make resolutions we can’t possibly keep. Making lifestyle changes takes time, and time is a scarce commodity these days. That’s why I’m proposing sustainable living as a New Year’s resolution this year.

Sustainability is a big deal to me. When I started creating solar luminaries, it was really important that I be as resourceful as possible. Almost all the parts I use to create my punch cup luminaries are gathered from the local landfill or are leftover from an estate sale. I believe this is where the true art comes to light - when you revitalize something that someone else just threw away.

I understand how daunting a “sustainable” lifestyle can seem. To make this a reachable goal, I’ve listed some ways to help you easily incorporate “reducing” into your daily life. Just think, if we all managed to maintain just a few of these steps, we could make the world a better place in 2017!

Green Lighting

If all Californians replaced five light bulbs with compact florescent lights, it would be the equivalent of taking 275,000 cars off the road. Turn off unnecessary lighting and use compact fluorescent lights instead of overhead lights. Use sunlight when possible to light up your home – sunlight is the best kind of light for our mood and general well-being!

Electronics

We should all probably take a small step away from our electronics anyway. By doing so we have a positive effect on our environment. Use surge protector power strips to switch off televisions, radios, monitors, printers, etc. when you leave the house. Use sleep mode for your computer (it really does make a difference). The plus side could be a lower energy bill!

Heating and Air

Lowering the temperature by 5 or 10 degrees can save you up to 20 percent in heating costs – that’s huge! Replace or clean furnace filters regularly and get a furnace tune-up to help heating efficiency. During the summer, adjust and set your air conditioner to 78% or warmer, health permitting.

Think Globally

Purchase organic and local products. Local produce isn’t shipped in, eliminating the pollution from long haul deliveries. When you’re finished with an item, don’t throw it away. Post it for free (www.Freecycle.org). Remember, “away” actually means “landfill”.

Conserve Water

Some simple ways to conserve water include using a bucket to collect shower water that can later be used to water plants or to clean. Turn off the shower while soaping up for just 6 minutes to eliminate an incredible 342 pounds of CO2 from your annual total. Just a reminder – as much as 19 percent of California’s electricity is used to pump, transport and treat water.


Unique Light Fixtures Perfect for Hand Painted Light Bulbs

Did you know our hand painted Mood-Lights fit in any light fixture a standard light bulb fits. Each Bulb is 25 watts filling the room with soft flattering Light & has a Universal Base so they’re made to fit in stand up lamps, hanging fixtures, wall sconces, and pendant fixtures. 

We’ve highlighted a few of our fun favorite light fixtures that are perfect for our bulbs adding that perfect dose of personality to our unique bulbs. Your space never looked so good.

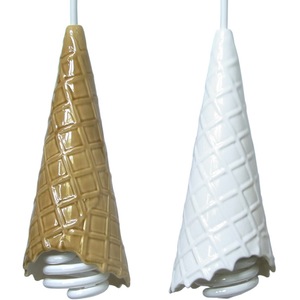
ICE CREAM CONE PENDANT LAMPS
Ice Cream Cone Lamp
I mean who doesn’t want ice cream cone pendant lamps in their space? Instant creativity, and curbs that sweet craving :)

Image: Alex Garnett 


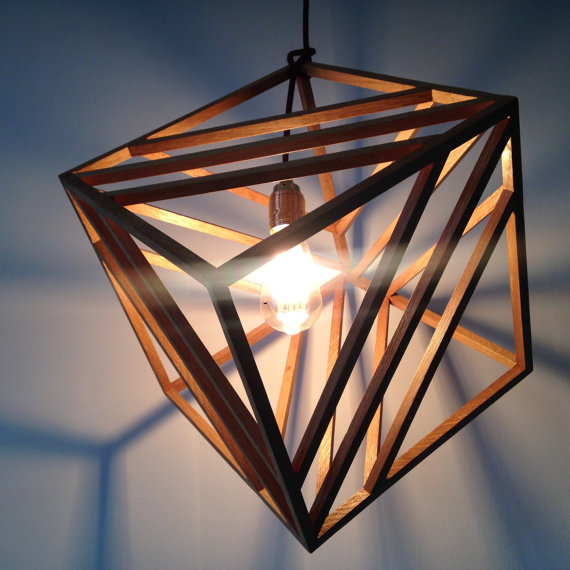
SACRED GEOMETRY INSPIRED

For a sacred geometry effect that projects throughout your space we love the COCO pendant light fixture by LIVLIVdesign,
Image: LIVLIV Design


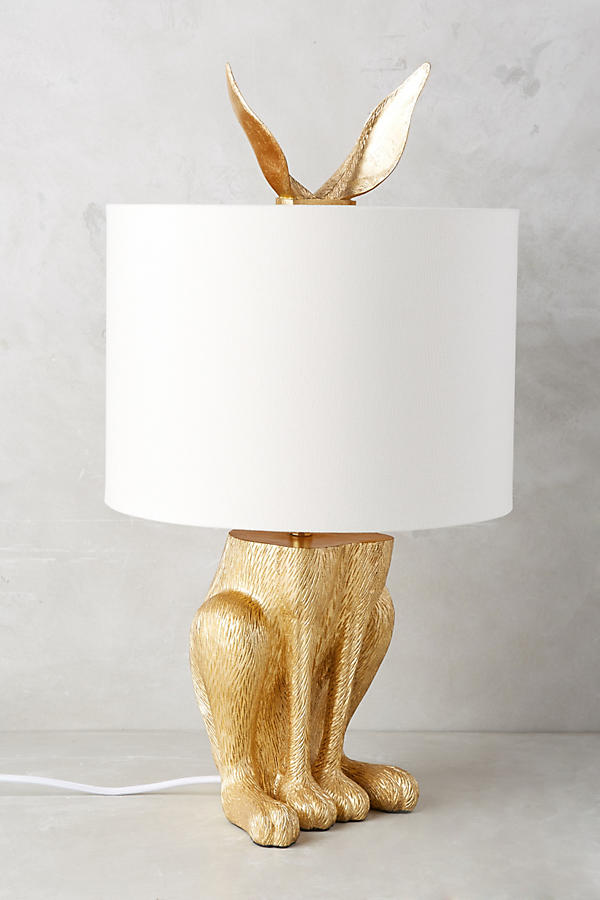
EVERYBUNNY LOVES THIS LAMP 

Find this personality plus lamp on Anthropologie.com, the Gilded Hare Lamp Ensemble
is sure to be a conversation starter and make you (and your guests) smile at each glance.

Visit our Pinterest board for a few more ideas.

SaveSaveSaveSaveSaveSave

DIY Holiday Decor

DIY Christmas decorations

Now that we’re past turkey day and in the full swing of the holiday season, it’s time we address a really important matter: holiday décor. Sure, the holidays are about spending time with family and eating delicious treats, but part of the fun is getting to redecorate your home or office!

I’m not as much of a shopper as I am a DIY’er. I love easy-to-do projects that can be customized. This time of year I’m “oooohing” and “ahhhhing” as I browse through Pinterest. Talk about creative! These decorations are really cute and super seasonal. It was hard to narrow it down to just a few, but I had to share a couple of my favorites.

Repurposed Light Bulb Christmas Ornaments


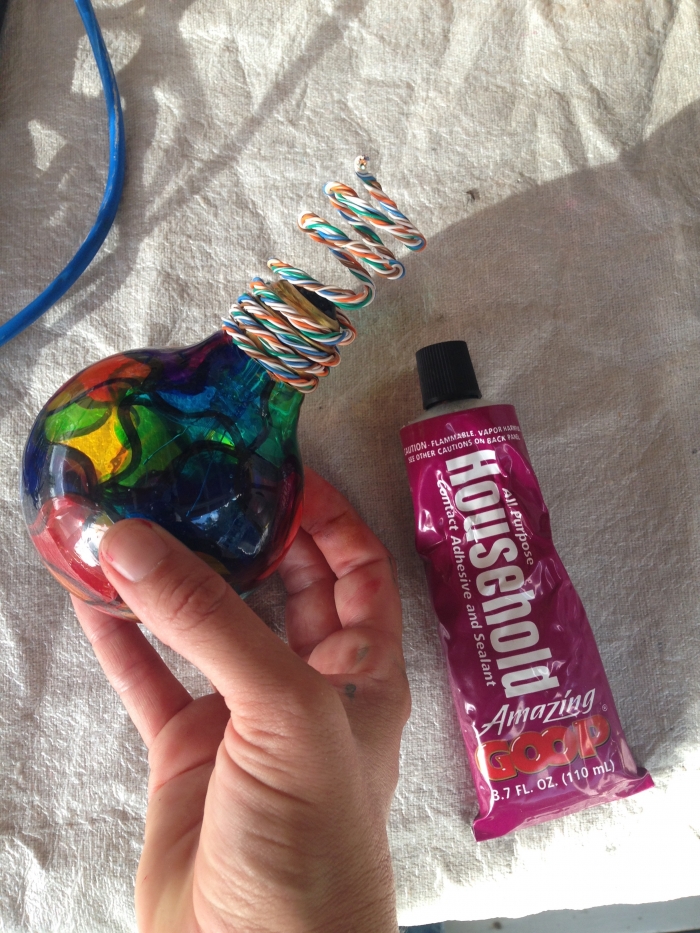
I shared these last year but they’re still a favorite. Plus, they’re really easy to make. And you can hang them anywhere (doesn’t have to be the tree) like the front porch or a house plant. Here’s the original blog with a how-to:  http://www.mood-lights.com/our-blog/33-repurposed-lightbulb-christmas-ornaments

DIY Mason Jar Luminaries


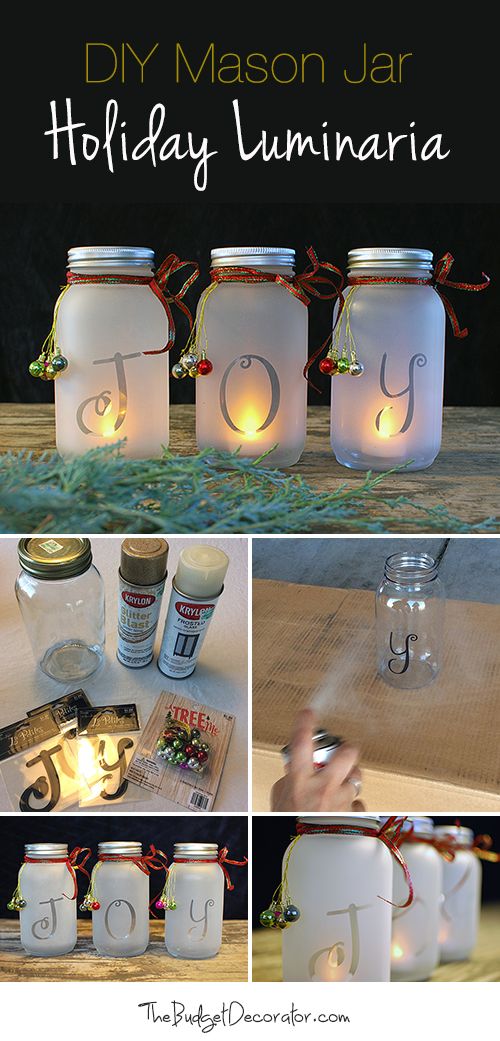
I love these mason jars because they’re SO easy! You can change these up – you don’t have to write JOY. Make some for the kids’ room with their initials, or use non-seasonal words like LOVE and HOPE. Try changing up the bells with twine for a more rustic look.

Hanging Paper Star Lanterns


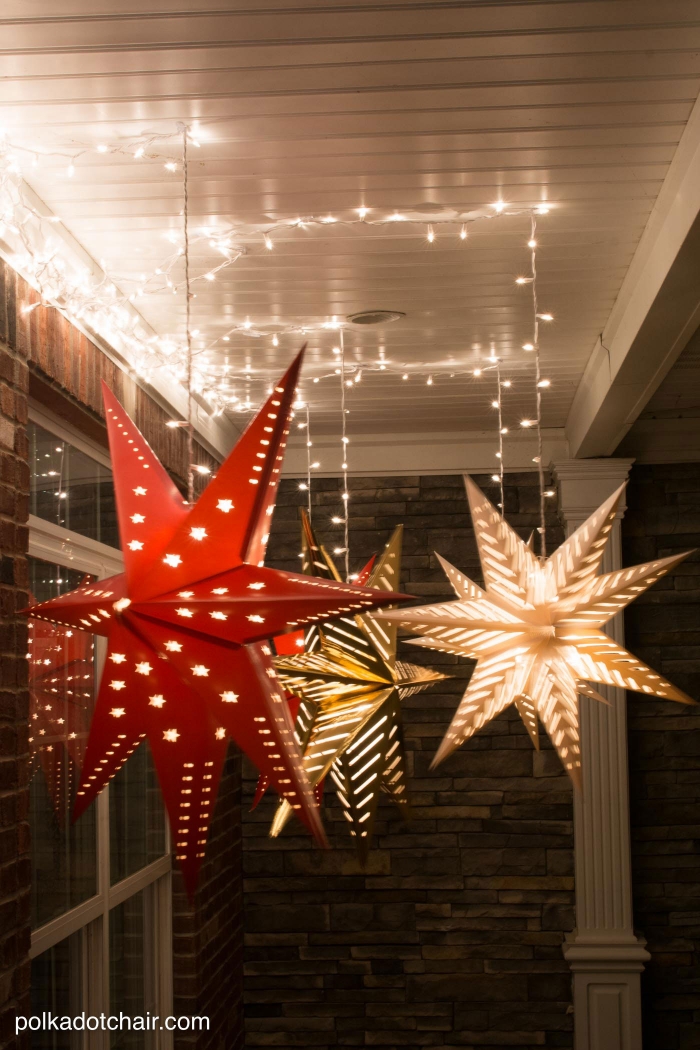
Talk about a beautiful winter night decoration. I’ve fallen head over heels for these hanging stars because of how majestic they are. These are a conversation piece, for sure. You can purchase these paper stars on Amazon.com, according to the original post. The idea to use Christmas lights is so creative and gives you room to experiment with different colored lights (you could create a Christmas star rainbow)!

Light-Up "Glowing" Snowballs


I’m telling you, there’s no limit to what you can do with chicken wire. You could use these light up snowballs to decorate your yard or your deck. Though this looks like a time consuming project, with a group of people it could come together quickly. This is taking those blow-up decorations to the next level.

Send me an email or post on Facebook if you tackle one of these projects. I would love to see photos! Follow me on Pinterest for more ideas on DIY holiday décor.
 

Native American History Month

Native American History Month

I’ve made a habit of abstaining from commenting on political matters. I’m more about being positive and spreading the love, if you couldn’t tell by now. However, I have to admit I’m saddened by the events happening in North Dakota, especially during such an important month.

Since 1990, November has been recognized as National Native American History Month. In fact, this month goes by many names but the idea is the same: to pay tribute to the contributions made by the first Americans, for the establishment and growth of the U.S. After all, wasn’t it Native Americans who welcomed the pilgrims home during the very first Thanksgiving?

The history of Native American History Month is a little convoluted, unfortunately. It began with Dr. Arthur C. Parker, a Seneca Indian, who was the director of the Museum of Arts and Science in Rochester, N.Y. His goal was simple: recognize the first “Americans” with a national holiday. He began by convincing the Boy Scouts of America to to set aside a day in observance which lasted three years.  In 1915, the annual Congress of the American Indian Association approved a plan concerning American Indian Day. Their president, Rev. Sherman Coolidge, an Arapahoe, issued a proclamation on Sept. 28, 1915, which declared the second Saturday of each May as an American Indian Day and contained the first formal appeal for recognition of Indians as citizens.

History goes on to show that no day was ever proclaimed. It wasn’t until George H. W. Bush in 1990 that November was designated “National American Indian Heritage Month”. About time, don’t you think?

The culture of Native American is as beautiful as you can get. Deeply rooted in spirituality, peace, prosperity… There are fantastic events that happen in November to celebrate the Indian heritage. Check out www.nativeamericanheritagemonth.gov for more of the history on this special month, and to find out how to get involved!